

How To Fit Canvas To Image Photoshop
How to use Photoshop's Image Sizing tool
Working with images (often known as bitmaps) is at the heart of Photoshop. Being able to manipulate bitmaps allows you to create an astonishing array of effects which are virtually unlimited.
In the past, the process ran into difficulty when you had an image that was too small. You could increase the size (upsample) but only so much before the image began to pixelate (fall apart) and the image would become blurry. One way of dealing with this issue has been to use the Unsharp filter to restore some of the sharpness to the image but the results have not been great.
This has changed with improvements to the Image Size tool in Photoshop CC. To see how it works, go to Image>Size.
Here is the upgraded Image Size dialog box:
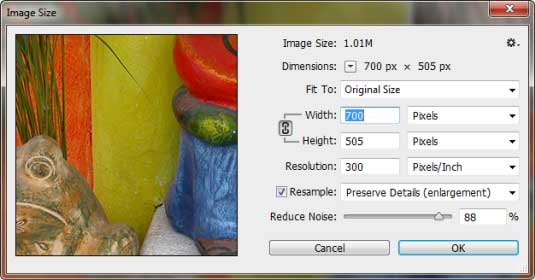
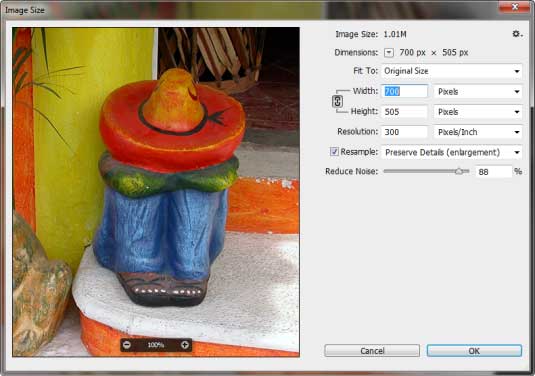
One of the first things to notice is that you can size the dialog box and display more of the image, as well as being able to zoom in/out of the image.
Here is the resized dialog box and image:
The other things you will notice are some new controls at the far right of the dialog box. These control the upsampling of the image.
Of these controls, enabling Resample gives you access to a popup menu with the following options: Automatic, Preserve Details (enlargement), Bicubic Smoother (enlargement), Bicubic Sharper (reduction), Bicubic (smooth gradients), Nearest Neighbor (hard edges), and Bilinear. All have keyboard shortcuts so you can access them quickly.
Here is what they do:
- Automatic: Photoshop automatically decides which resampling method to use, regardless of whether you are increasing or decreasing the size of an image.
- Preserve Details (enlargement): This gives you access to the Noise reduction slider to smooth out noise when upsampling an image.
- Bicubic Smoother (enlargement): This is based on Bicubic interpolation but creates a smoother image.
- Bicubic Sharper (reduction): This uses Bicubic interpolation with sharpening for reducing images. If this method creates too much sharpening in your image, use Bicubic instead.
- Bicubic (smoother gradients): This method produces smooth tonal gradations and is a better option than Nearest Neighbor or Bilinear.
- Nearest Neighbor (hard edges): This method replicates the pixels in an image. It preserves hard edges and will create a smaller file with illustration that doesn't use anti-aliasing on the edges. The down side is it can also create jagged effects, which can appear if the image is scaled, distorted or manipulated.
- Bilinear: This method adds pixels by creating average values of surrounding pixels.
Note that if you choose the Preserve Details setting, the Reduce Noise slider will also appear. This gives you additional control over the quality of the image.
When you test out the controls on your image you will find that some of the resampling tools work better than others. Fortunately, due to their accessibility, testing all the options will only take a couple of minutes at most.
According to Adobe, in actual practice you will most likely be working with the Preserve Details and Reduce Noise options. It is also recommended that you use percentages instead of pixels (while you are learning) so you know by how much an image has been increased or decreased in size. Later, when you are more familiar with the results, you could switch the measurement to inches, pixels, etc.
Here is an example of that in actual practice where the image has been upsampled by 300%.

When you click on OK, Photoshop takes a few seconds to process the image. The result becomes the new native file size for that image.
Limitations
While you the image Sizing tool offers a lot of potential, there are some limitations, which are:
- The image must be of good quality before you begin. Good color saturation, sharpness and edge-to-edge detail is important.
- Shadows which have darkened to black or blown out highlights cannot be repaired.
- The image must be a reasonable size to start with. If your image is an icon, (100x100 pixels), don't expect great results, partly due to the lack of color information.
Conclusion
When planning to use the new features with the Image Resize tool it is important to be aware of your desired outcome. If you plan to use an image for the web and make it a little bigger, that should be no problem. If you plan to use a screen resolution image for print, that's something else. The only real way to find out if the image will work for you - or not, is to test it and see what happens.
What you might find is Photoshop can actually improve the sharpness and detail over the original. I tested the Image Size tool with another image and it brought in quite a bit of noise. Within a few seconds I was able to eliminate much of it with the Remove Noise slider and the result was excellent.
In the above screen shot, I enlarged the original image by 800%. As you can see there is a bit of softening around the eye, even with the Reduce Noise setting applied but the overall result is still impressive.
Words: Nathan Segal
Related articles
How To Fit Canvas To Image Photoshop
Source: https://www.creativebloq.com/adobe/photoshop-cc-image-sizing-61411983
Posted by: juddwrick1979.blogspot.com
0 Response to "How To Fit Canvas To Image Photoshop"
Post a Comment